Configuration
Configuration Options
-

Which Payment Service Provider?
In most cases you would have one payment service provider you have to configure, Ogone or PostFinance. However, it's possible to configure for both providers in one shop. Two plugins are available for each provider, a DirectLink and a Redirect version. The following configuration descriptions are based on Ogone as provider and are identical for PostFinance just with minor differences (Gateway URL and visual appearance of Backoffice site). -
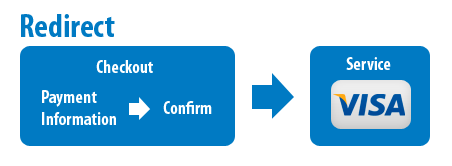
Redirect Option (mandatory)
This is the basic configuration. It works with all shop implementations (without SSL). In checkout, in payment information, the customer just get informed, that he will be redirected to the payment page of the provider after he has confirmed his order.
Always configure the Redirect option. If DirectLink is configured and a Administrator creates a order on behalf of a client, it switches automatically to the Redirect method, so the client can pay afterwards by clicking the button in the order or by clicking a link in the order confirmation email. If DirectLink is configured, the Redirect method is hidden in checkout. -
DirectLink Option (optional)
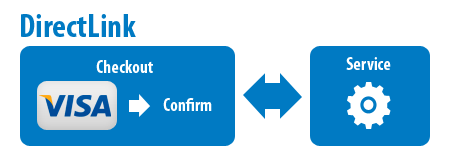
Important! You need DirectLink enabled in the Backoffice of your payment provider. Not all subscriptions allow you to use this feature!
This is the advanced configuration, using a two step processing (reservation and capture) at the payment service provider. In checkout, in payment information, the customer selects the payment option and enters/confirms his payment information (in a Iframe or a popup). The customer can proceed with the checkout, if a reservation at the service provider was successful. After the customer has confirmed his order, the reservation is automatically captured in the background with server to server communication.
Your shop must be SSL enabled to use DirectLink. But it's not necessary to have a PCI-DSS certification.
Configure Redirect Payment Method
-

Activate the Redirect Payment Method
Select "Configuration" > "Payment Methods" from the menu and locate the Ogone Redirect payment method. Click "Edit" and activate the "is active" checkbox. Specify a optional "Display Order". Click "Update". Change the localizable name in the list of plugins. -
Configure the Redirect Payment Method
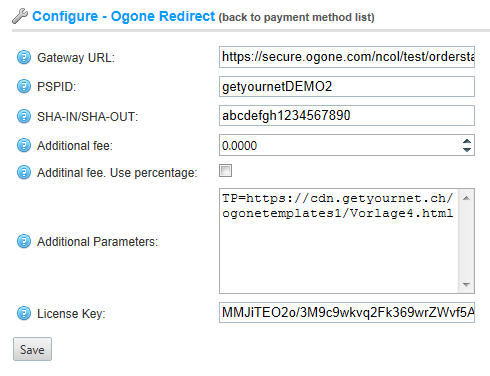
Click "Configure" to open the configuration page.-
Gateway URL
Enter the Gateway URL provided by Ogone.
-
PSPID
Enter the PSPID provided by Ogone.
-
SHA-IN/SHA-OUT
Enter the same SHA-IN/SHA-OUT pass phrase you configured in Ogone Backoffice (see below). The SHA-IN/SHA-OUT pass phrase is your own password (free definition). It's used to create signed and secure communication between your store and the payment service. Keep it save!
-
Additional fee
Enter a optional additional fee when customers select this payment method.
-
Additional fee use percentage
Check if the optional additional fee is a percentage value of the cart total.
-
Additional Parameters
Add additional parameters line by line in the form <parameter>=<value> to customize the payment page at Ogone. Consult the implementation guide provided by Ogone to see what parameters can bee used.
-
License Key
Paste in your licence key, see the page License to generate your license key. You don't need a license key to test the plugins. The plugins are fully functional without a license key with amounts up to 100.-.
-
Click "Save" to save your configuration values.
-
Configure DirectLink Payment Method (optional)
-

Activate the DirectLink Payment Method
Select "Configuration" > "Payment Methods" from the menu and locate the Ogone DirectLink payment method. Click "Edit" and activate the "is active" checkbox. Specify a optional "Display Order". Click "Update". Change the localizable name in the list of plugins. -
Configure the DirectLink Payment Method
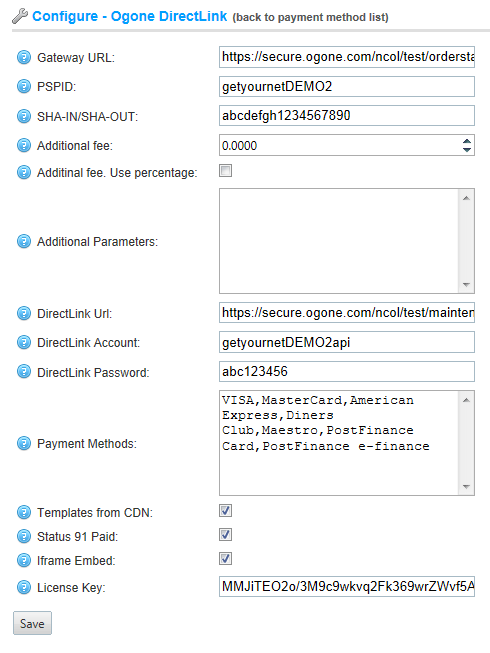
Click "Configure" to open the configuration page.-
Gateway URL
Enter the Gateway URL provided by Ogone.
-
PSPID
Enter the PSPID provided by Ogone.
-
SHA-IN/SHA-OUT
Enter the same SHA-IN/SHA-OUT pass phrase you configured in Ogone Backoffice (see below). The SHA-IN/SHA-OUT pass phrase is your own password (free definition). It's used to create signed and secure communication between your store and the payment service. Keep it save!
-
Additional fee
Enter a optional additional fee when customers select this payment method.
-
Additional fee use percentage
Check if the optional additional fee is a percentage value of the cart total.
-
Additional Parameters
Add additional parameters line by line in the form <parameter>=<value> to customize the payment page at Ogone. Consult the implementation guide provided by Ogone to see what parameters can bee used.
-
DirectLink URL
Enter the DirectLink maintenance URL provided by Ogone.
-
DirectLink Account
Enter the account name you have configured for DirectLink (see more in Backoffice configuration below).
-
DirectLink Password
Enter the password of the account you have configured for DirectLink (see more in Backoffice configuration below).
-
Payment Methods
The comma separated list of payment methods you have activated in Ogone Backoffice. Preconfigured with all available payment methods in the plugin. To disable a payment method, just insert a blank after the first character of the name.
-
Templates from CDN
Pages from Ogone are displayed using special templates. These templates must be public available at a SSL secured site. If enabled, the templates are loaded from https://cdn.getyournet.ch, if disabled, the templates are loaded from your store.
-
Status 91 Paid
After the customer has confirmed his order, a background process captures the payment reservation. This sets the payment status at Ogone to 91 (processing) and after some minutes to 9 (paid). If enabled, allows immediate access to downloadable products, but with a small risk the reservation can not be captured.
-
Iframe Embed
The integrated payment reservation page can be displayed in a Iframe or in a popup window.
-
License Key
Paste in your licence key, see the page License to generate your license key. You don't need a license key to test the plugins. The plugins are fully functional without a license key with amounts up to 100.-.
-
Click "Save" to save your configuration values.
-
Translate Messages
-
Translate the Messages Customers see in Checkout
In the checkout procedure, some messages are displayed to the customer. Translate the messages to all languages you have activated in your store. Go to "Configuration" > "Languages" and select "View string resources". Search/Filter for the following resource names:Resource Name Value English Plugins.Payments.PostFinanceGYN.Fields.RedirectionTip After you confirmed your order, you will be redirected to PostFinance to pay your order. Plugins.Payments.OgoneGYN.Fields.RedirectionTip After you confirmed your order, you will be redirected to Ogone to pay your order. Plugins.Payments.OgoneGYN.Fields.SelectPaymentInfo Please select a payment option and complete your payment information in the opened window. Plugins.Payments.OgoneGYN.Fields.WaitingPaymentInfo Waiting your payment information has been received... Plugins.Payments.OgoneGYN.Fields.AcceptedPaymentInfo Your payment information has been accepted.
Configure Backoffice
-
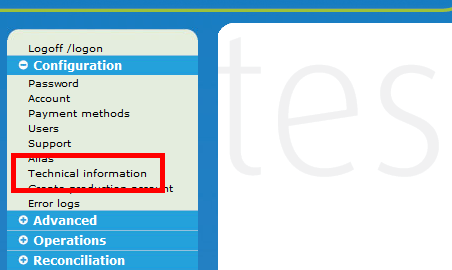
Open Ogone Backoffice Site
Login at your Ogone Backoffice account and select "Technical Information". See screen shots below of all important tabs in this area and how to apply the configuration settings needed to implement your payment methods you have configured in nopCommerce. -
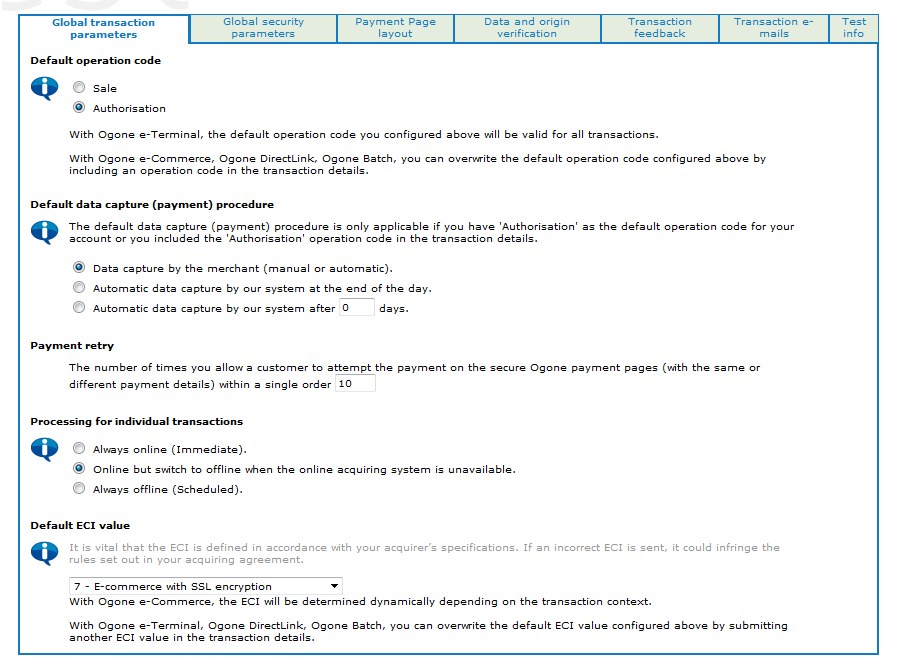
Settings "Global transaction parameters"
Apply the setting of this screenshot.
-
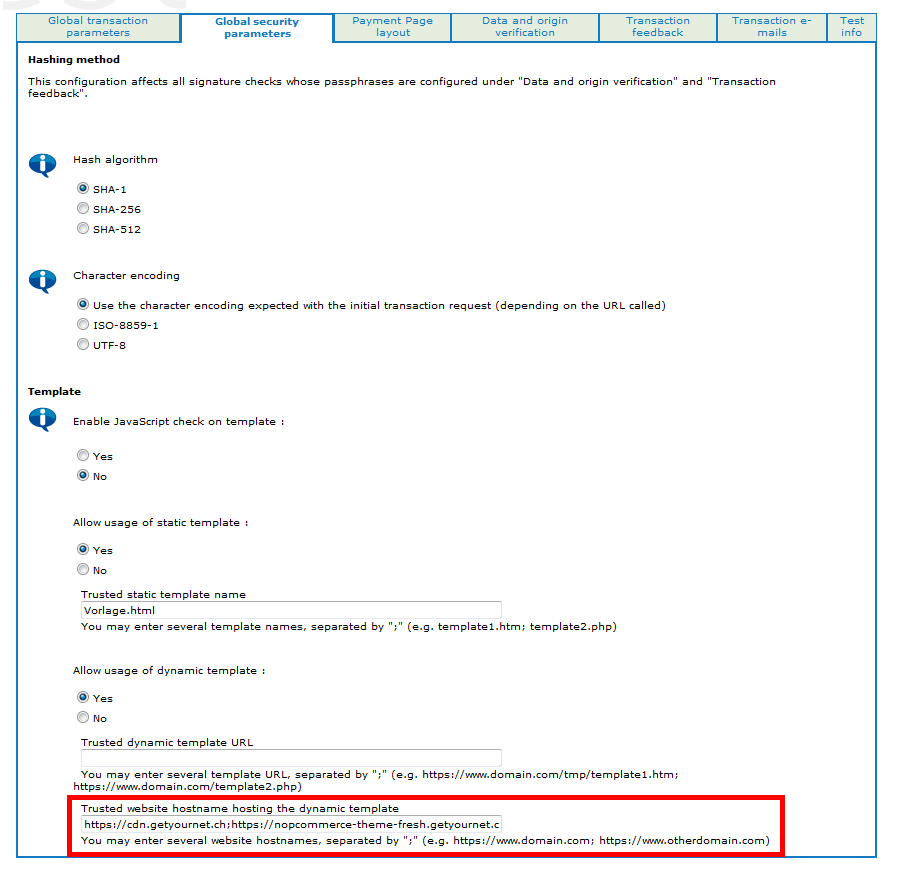
Settings "Global security parameters"
If you have configured DirectLink, enter the trusted website hostnames for templates. Configure the hostname https://cdn.getyournet.ch and the url of your store. See also the configuration option Templates from CDN.
-
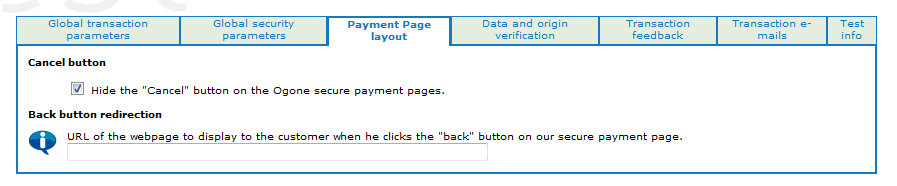
Settings "Payment Page layout"
Apply the setting of this screenshot.
-
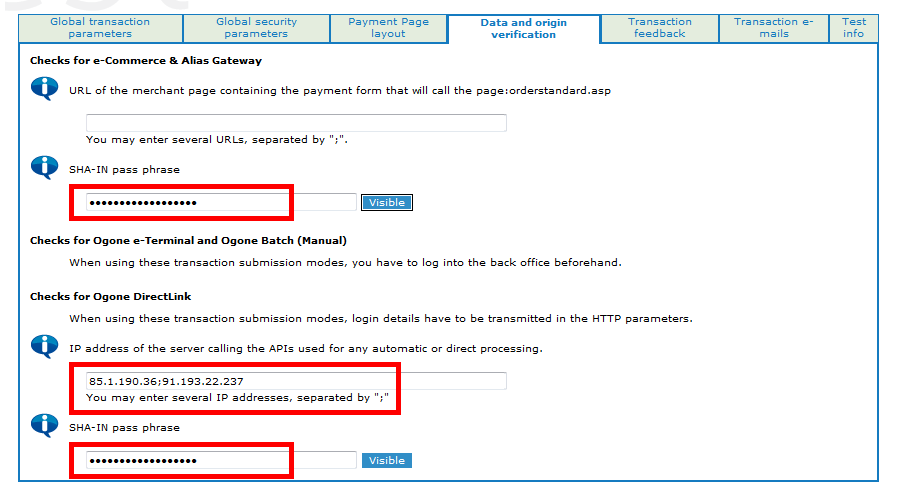
Settings "Data and origin verification"
If you have configured DirectLink, enter the IP address of your server (or leave it empty if SHA-IN configured). Enter the same SHA-IN/SHA-OUT pass phrase you have used in the configuration of the plugins (see above). The SHA-IN/SHA-OUT pass phrase is your own password (free definition). It's used to create signed and secure communication between your store and the payment service. Keep it save!
-
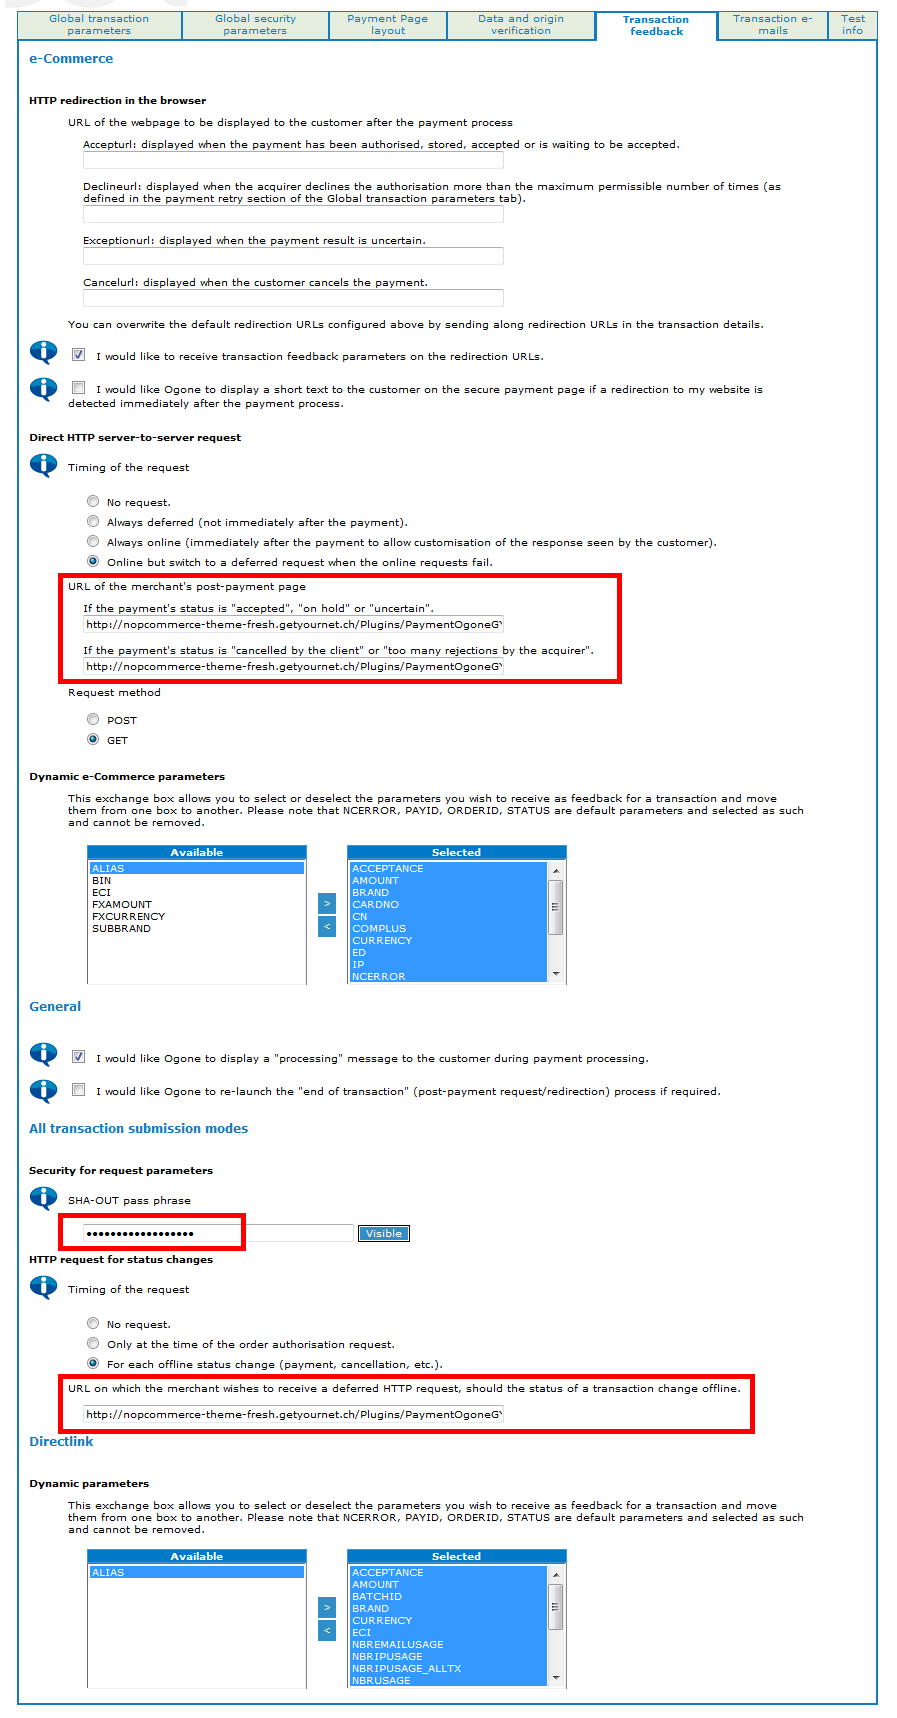
Settings "Transaction feedback"
Set the URLs for server to server communication and status changes to http://<your store url>/Plugins/PaymentOgoneGYN/IPNHandler
Enter the same SHA-IN/SHA-OUT pass phrase you have used in the configuration of the plugins (see above). The SHA-IN/SHA-OUT pass phrase is your own password (free definition). It's used to create signed and secure communication between your store and the payment service. Keep it save!
-
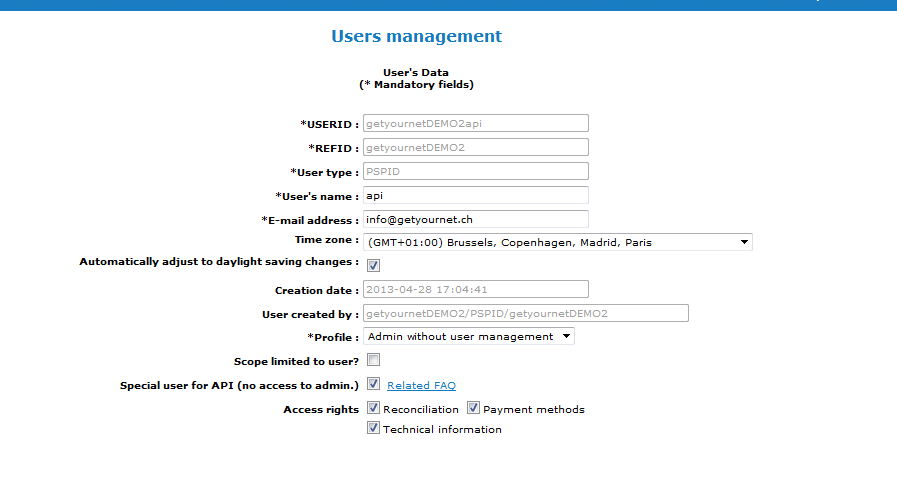
Create DirectLink API User
If you have configured DirectLink, create a special API user with the following settings:
Quick Payment Link
-
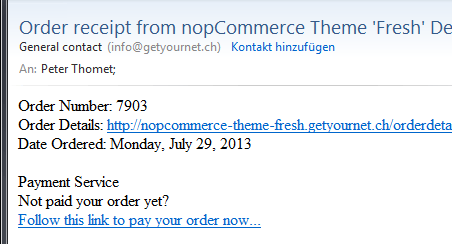
Quick Payment Link URL
For all Redirect Payment Methods, a special link can be used to redirect a client to the payment page of the payment service provider. Form of the url:
<Store URL>/orderpaymentservice/<Order ID>
This link, together with any text you like, can be integrated into the email templates. It can also be helpful to use it together with this Customer Reminder Plugin.
Switch to Production
-
Contact Payment Service Provider
Contact your Payment Service Provider to order your Backoffice for production use with the services enabled you need. Your Backoffice for production use will be preconfigured with the settings of your test environment. -
Reconfigure the Payment Methods in nopCommerce for Production
To use your payment methods with the Backoffice production environment, you need to change the configuration of the plugins in nopCommerce. Apply the settings Gateway URL, PSPID and DirectLink URL provided. Change accounts and passwords (SHA-IN/SHA-OUT).